Version: 25.11.01
In this tutorial, I will show you how to install a Tor server as a middle relay on a VPS. At the same time, you’ll set up a proxy server that allows you to use the Tor connection in a web browser (e.g., Firefox) to browse the internet anonymously. This way, your own browsing behavior is mixed with the traffic passing through the server.
✅ What do you need?
1. A VPS server with a public IPv4 address on the internet and enough free traffic per month (up to 2,5TB in our configuration)
2. Linux and SSH knowledge (terminal)
3. Docker and Docker-Compose installed (an installation script will also be shown)
4. The conviction to take action against censorship and restrictions on freedom on the internet ?
We start and log in to the server:
ssh Username@Server-IPGo to your Docker project folder, which in my case is located under /home/.
cd /home/A folder named “tor” is created:
mkdir torAnd changed into this:
cd torIf you don’t have Docker and Docker-Compose installed yet, here are some quick installation instructions. You can skip them if you like: First, install Docker by creating a file named “install.sh” in the /home/tor/ directory:
nano /home/tor/install.shThe following content is added to the file:
#!/usr/bin/env bash
# Script: docker-install-commander.sh
# Purpose: Install Docker & Docker Compose for Ubuntu/Debian
# Author: Tom Commander (IT-Service-Commander.de)
# Date: 2025-11-01

set -euo pipefail

# ===== Settings (optional) =====
# Additionally install the standalone docker-compose binary (besides the plugin)?
INSTALL_COMPOSE_STANDALONE=false
COMPOSE_VERSION="v2.30.3"  # only relevant if the above is true

# ===== Helper functions =====
need_cmd() { command -v "$1" >/dev/null 2>&1 || { echo "Error: '$1' is required."; exit 1; }; }
as_root()   { if [ "$(id -u)" -eq 0 ]; then bash -c "$*"; else sudo bash -c "$*"; fi; }

# ===== Detect system =====
need_cmd awk
if [ -r /etc/os-release ]; then
  . /etc/os-release
else
  echo "Error: /etc/os-release not found. Aborting."
  exit 1
fi

ID_LOWER="${ID,,}"                  # ubuntu | debian | linuxmint | ...
ARCH="$(dpkg --print-architecture)"

# Normalize to an upstream family + codename for Docker repo selection
FAMILY=""        # "ubuntu" or "debian"
CODENAME=""      # e.g., jammy/noble/bookworm

case "$ID_LOWER" in
  ubuntu)
    FAMILY="ubuntu"
    CODENAME="${VERSION_CODENAME:-}"
    ;;
  debian)
    FAMILY="debian"
    CODENAME="${VERSION_CODENAME:-}"
    ;;
  linuxmint)
    # Regular Linux Mint is Ubuntu-based -> use UBUNTU_CODENAME.
    # LMDE is Debian-based -> has DEBIAN_CODENAME.
    if [ -n "${UBUNTU_CODENAME:-}" ]; then
      FAMILY="ubuntu"
      CODENAME="$UBUNTU_CODENAME"
    elif [ -n "${DEBIAN_CODENAME:-}" ]; then
      FAMILY="debian"
      CODENAME="$DEBIAN_CODENAME"
    else
      echo "Linux Mint detected but could not determine upstream codename (UBUNTU_CODENAME/DEBIAN_CODENAME missing)."
      exit 1
    fi
    ;;
  *)
    echo "This script supports Ubuntu, Debian, and Linux Mint. Detected: ${ID_LOWER}"
    exit 1
    ;;
esac

if [[ -z "$CODENAME" ]]; then
  echo "Could not determine upstream codename. Please set VERSION_CODENAME/UBUNTU_CODENAME/DEBIAN_CODENAME."
  exit 1
fi

echo "Detected system: ${PRETTY_NAME:-$ID_LOWER} (family: $FAMILY, codename: $CODENAME, arch: $ARCH)"

# ===== Preparation =====
echo "[1/6] Updating package list and installing prerequisites..."
as_root "apt-get update -y"
as_root "apt-get install -y ca-certificates curl gnupg lsb-release"

# Ensure keyring directory exists
as_root "install -m 0755 -d /etc/apt/keyrings"

# ===== Docker GPG key =====
echo "[2/6] Installing Docker GPG key..."
KEY_DST="/etc/apt/keyrings/docker.gpg"
if [[ "$FAMILY" == "ubuntu" ]]; then
  as_root "curl -fsSL https://download.docker.com/linux/ubuntu/gpg | gpg --dearmor -o '$KEY_DST'"
else
  as_root "curl -fsSL https://download.docker.com/linux/debian/gpg | gpg --dearmor -o '$KEY_DST'"
fi
as_root "chmod a+r '$KEY_DST'"

# ===== Add repository (idempotent) =====
echo "[3/6] Adding Docker APT repository..."
DOCKER_LIST="/etc/apt/sources.list.d/docker.list"
REPO_LINE="deb [arch=${ARCH} signed-by=${KEY_DST}] https://download.docker.com/linux/${FAMILY} ${CODENAME} stable"

if [ -f "$DOCKER_LIST" ] && grep -q "download.docker.com/linux" "$DOCKER_LIST"; then
  echo "Docker repository already exists: $DOCKER_LIST"
else
  as_root "echo '$REPO_LINE' > '$DOCKER_LIST'"
fi

# ===== Install Docker & Compose plugin =====
echo "[4/6] Installing Docker and Compose plugin..."
as_root "apt-get update -y"
as_root "apt-get install -y docker-ce docker-ce-cli containerd.io docker-buildx-plugin docker-compose-plugin"

# ===== Enable and start Docker =====
echo "[5/6] Enabling and starting Docker service..."
as_root "systemctl enable docker >/dev/null 2>&1 || true"
as_root "systemctl restart docker"

# ===== Add user to docker group =====
if [ "$(id -u)" -ne 0 ]; then
  echo "[6/6] Adding user '$USER' to the 'docker' group..."
  as_root "usermod -aG docker '$USER'"
  echo "Note: Log out and back in (or run 'newgrp docker') for group changes to take effect."
else
  echo "[6/6] Running as root: skipping user group modification."
fi

# ===== Optional: Install standalone docker-compose binary =====
if [ "$INSTALL_COMPOSE_STANDALONE" = true ]; then
  echo "[Optional] Installing standalone docker-compose ${COMPOSE_VERSION}..."
  need_cmd uname
  as_root "curl -L \"https://github.com/docker/compose/releases/download/${COMPOSE_VERSION}/docker-compose-$(uname -s)-$(uname -m)\" -o /usr/local/bin/docker-compose"
  as_root "chmod +x /usr/local/bin/docker-compose"
  echo "docker-compose version: $(/usr/local/bin/docker-compose --version || true)"
fi

# ===== Show versions =====
echo
echo "✅ Installation complete!"
echo "Docker:           $(docker --version 2>/dev/null || echo 'Not in PATH? Try logging out and back in.')"
echo "Docker Compose:   $(docker compose version 2>/dev/null || echo 'Plugin not found')"
echo
echo "Tip: Test your setup with ->  docker run --rm hello-world"
Then run the file:
cd /home/tor
bash install.sh
After completing the script, Docker and Docker-Compose are installed.
Now we want to focus on the Tor server and create the following file in the /home/tor folder:
nano DockerfilePaste the following content into the file and save it – the current Tor version 0.4.8.19 is used:
# Basis-Image mit aktueller Tor-Version
FROM ubuntu:24.04

# Basis-Tools installieren
RUN apt-get update && apt-get install -y \
    curl \
    gnupg2 \
    apt-transport-https \
    ca-certificates \
    python3 \
    python3-pip \
    git \
    locales \
    privoxy

# UTF-8 Locale setzen (für Nyx)
RUN sed -i '/en_US.UTF-8/s/^# //g' /etc/locale.gen && \
    locale-gen

ENV LANG=en_US.UTF-8
ENV LANGUAGE=en_US:en
ENV LC_ALL=en_US.UTF-8

# Offiziellen Tor-GPG-Schlüssel importieren
RUN curl -fsSL https://deb.torproject.org/torproject.org/A3C4F0F979CAA22CDBA8F512EE8CBC9E886DDD89.asc \
    | gpg --dearmor -o /usr/share/keyrings/tor-archive-keyring.gpg

# Tor-Repository einbinden
RUN echo "deb [signed-by=/usr/share/keyrings/tor-archive-keyring.gpg] https://deb.torproject.org/torproject.org noble main" \
    > /etc/apt/sources.list.d/tor.list

# Tor installieren
RUN apt-get update && apt-get install -y \
    tor \
    deb.torproject.org-keyring && \
    apt-get clean && rm -rf /var/lib/apt/lists/*

# Nyx installieren
RUN apt-get update && apt-get install -y nyx && \
    apt-get clean && rm -rf /var/lib/apt/lists/*

# Konfigurationsdateien & Startskript kopieren
COPY privoxy.config /etc/privoxy/config
COPY start.sh /start.sh
RUN chmod +x /start.sh

# Ports freigeben
EXPOSE 9001 9030 8118

# Startkommando
CMD ["/start.sh"]
A new file is created:
nano start.shThis file ensures that Privoxy (our proxy server through which you can later access Tor via port 8118) and NYX only start after the Tor server has started:
#!/bin/bash
set -e

# Starte Tor im Hintergrund
tor -f /etc/tor/torrc &

# Warte kurz, bis Tor initialisiert ist
sleep 5

# Wenn ein Terminal vorhanden ist, starte Nyx in einem neuen Prozess
if [ -t 1 ]; then
  echo "Starte Nyx zur Überwachung von Tor..."
  nyx &
fi

# Starte Privoxy im Vordergrund (wichtig für Docker!)
exec privoxy --no-daemon /etc/privoxy/config
The next file you create:
nano torrcThe following content goes here:
Nickname Nickname
ContactInfo contact@proton.me

ORPort 9001 IPv4Only
DirPort 9030
ControlPort 9051
CookieAuthentication 1
ExitRelay 0

DataDirectory /var/lib/tor

RelayBandwidthRate 1 MB
RelayBandwidthBurst 2 MB

Log notice stdout

#Address VPS-IP(optional)
Of course, you’ll also need to change your relay’s nickname and contact email address accordingly. In our example, the Tor relay is only running as an IPv4 host, which is easier to implement. A new file follows:
nano privoxy.configThis is the configuration file of our proxy server:
listen-address  0.0.0.0:8118
forward-socks5t /               127.0.0.1:9050 .
logfile /dev/stdout
After you have created this file, you can build your own Docker image (everything will be saved and executed in the path /home/tor/):
docker build -t tor-privoxy-nyx .You’ve now created your own Docker container with Tor Privoxy. You can verify this with the “docker images” command. The corresponding container should now appear here:

⚙️ Create the appropriate Docker-Compose.yml to start the container properly and safely:
nano docker-compose.ymlThe file is saved in the /home/tor folder with the following content:
version: '3.8'

services:
  tor-privoxy:
    build: .
    image: tor-privoxy-nyx
    container_name: tor-privoxy-nyx
    volumes:
      - ./torrc:/etc/tor/torrc
      - ./tor_data:/var/lib/tor
    ports:
      - "9001:9001"
      - "9030:9030"
      - "8118:8118"
    restart: always
Now you’ve completed all the steps to run a Tor server as a middle node on our VPS server. You can now start the container in the background:
docker compose up -dYou can view log files with
docker logs -f tor-privoxy-nyxIf you find “100%” in the logs, you’ve done everything correctly:
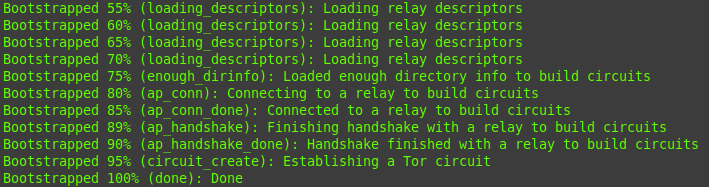
It is also important that ports 9001 and 9030 are accessible from the Internet and are open in the firewall.
Cauction: Only Allow Connections from your private IP to Port 8118 or block it. Thats the proxy-server function.
There is also the following function test for the proxy server:
curl --proxy http://localhost:8118 https://check.torproject.org/A confirmation should appear here that a connection via TOR was possible.
✅ What have you achieved in the tutorial?
- The latest version of TOR runs in a Docker container on the VPS server.
- Privoxy and NYX are installed
- Fingerprints and RSA Keys are saved in the “tor” directory outside the container
- The Tor server is publicly accessible via TCP ports 9001 and 9030.
- The proxy server that uses Tor is accessible via IP:8118 and can thus be specified as a proxy in the browser, for example (Cauction: Port 8118 only for your IP in the firewall settings of your vps)
- You are actively committed to freedom on the Internet ?
You can watch statistic via nyx with:
docker exec -it tor-privoxy-nyx bashnyx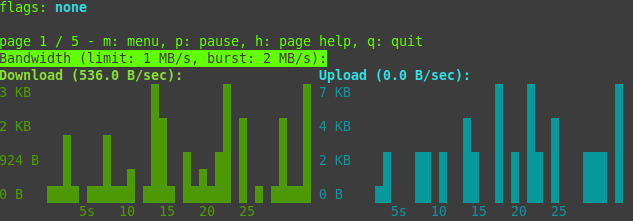
Leave the Statistic-Page with STRG+C and then type “exit”.
On the following page you can also retrieve information about your own Tor Relay:
https://metrics.torproject.org/rs.html
 |  | |
| bc1pnks6qsyumceygnw760x6dthqzngm3pt5xtpkrh3n9ydm3e8ekgms7r4azl | Lightning: itsc@strike.me | https://paypal.me/TomC777 |
 |  |  |