


Version: 25.11.01
In the following tutorial we want to install Matrix Synapse including SSL certificates from Letsencrypt with the Nginx Proxy Manager on a VPS on the Internet (in our case at Hetzner.com).
A big thank you goes to Patrick from https://www.cleveradmin.de/ with whom I worked out a great solution!
✅ Requirements:
– A domain is available with access to the DNS entries
– VPS is set up with root access (Ubuntu)
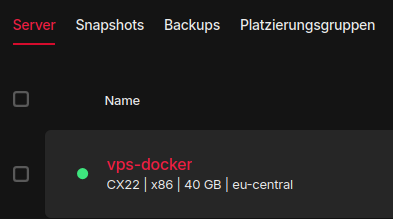
A small server from e.g. Hetzner.com is sufficient here:
⚠️ Firewall: Please configure the firewall at Hetzner and only allow the following ports:
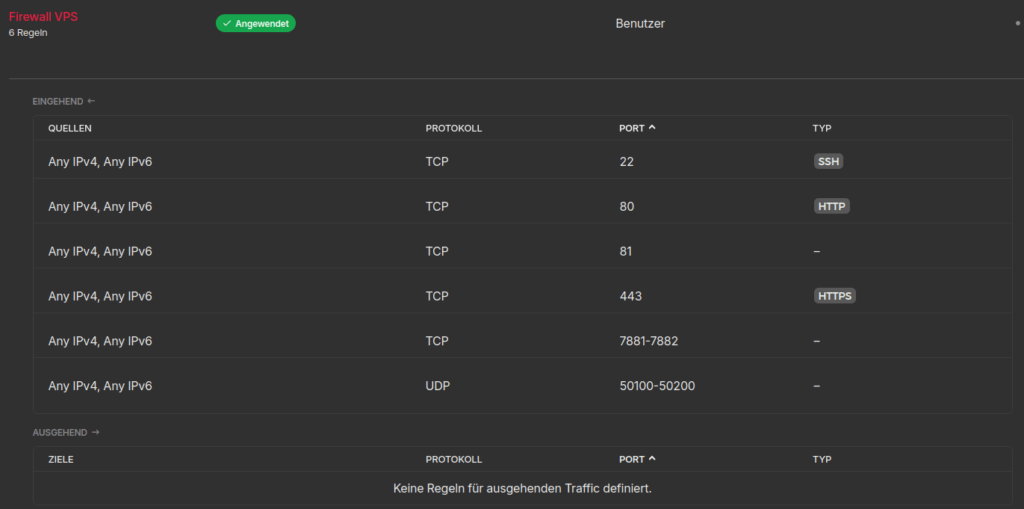
TCP: 22, 80, 81, 443 (Matrix Synapse, NPM)
TCP: 7881-7882 and UDP 50100 – 50200 are the preparation for Element Call
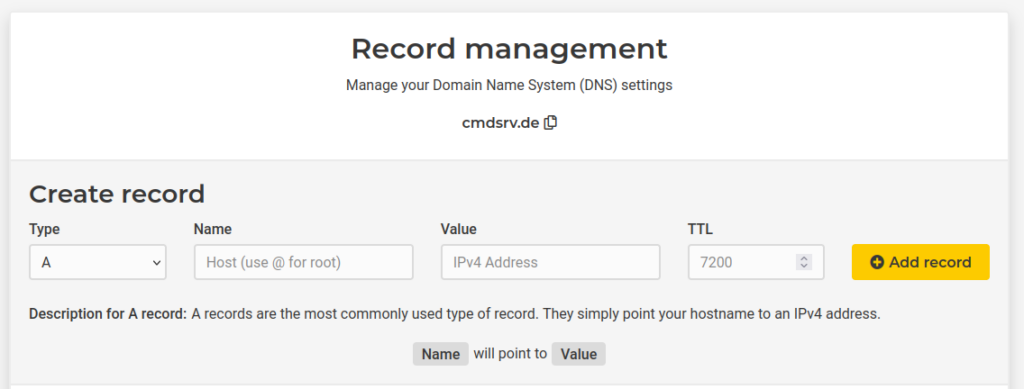
⚠️ DNS access must also be available for an existing domain:
We start and log in to the server:
ssh root@SERVER-IPFirst we make sure that the server is up to date with the following command:
apt-get update && apt-get upgrade && apt-get autoremoveWe then restart the server and log in again:
sudo reboot nowWe create the folders for our two projects (Synapse and Nginx Proxy Manager -NPM-)
mkdir -p /home/npm
mkdir -p /home/synapse/data
Now we first install Docker by creating a file called “install.sh” in the /home/ directory:
nano /home/install.shThe file contains the following content:
#!/usr/bin/env bash
# Script: docker-install-commander.sh
# Purpose: Install Docker & Docker Compose for Ubuntu/Debian
# Author: Tom Commander (IT-Service-Commander.de)
# Date: 2025-11-01

set -euo pipefail

# ===== Settings (optional) =====
# Additionally install the standalone docker-compose binary (besides the plugin)?
INSTALL_COMPOSE_STANDALONE=false
COMPOSE_VERSION="v2.30.3"  # only relevant if the above is true

# ===== Helper functions =====
need_cmd() { command -v "$1" >/dev/null 2>&1 || { echo "Error: '$1' is required."; exit 1; }; }
as_root()   { if [ "$(id -u)" -eq 0 ]; then bash -c "$*"; else sudo bash -c "$*"; fi; }

# ===== Detect system =====
need_cmd awk
if [ -r /etc/os-release ]; then
  . /etc/os-release
else
  echo "Error: /etc/os-release not found. Aborting."
  exit 1
fi

ID_LOWER="${ID,,}"                  # ubuntu | debian | linuxmint | ...
ARCH="$(dpkg --print-architecture)"

# Normalize to an upstream family + codename for Docker repo selection
FAMILY=""        # "ubuntu" or "debian"
CODENAME=""      # e.g., jammy/noble/bookworm

case "$ID_LOWER" in
  ubuntu)
    FAMILY="ubuntu"
    CODENAME="${VERSION_CODENAME:-}"
    ;;
  debian)
    FAMILY="debian"
    CODENAME="${VERSION_CODENAME:-}"
    ;;
  linuxmint)
    # Regular Linux Mint is Ubuntu-based -> use UBUNTU_CODENAME.
    # LMDE is Debian-based -> has DEBIAN_CODENAME.
    if [ -n "${UBUNTU_CODENAME:-}" ]; then
      FAMILY="ubuntu"
      CODENAME="$UBUNTU_CODENAME"
    elif [ -n "${DEBIAN_CODENAME:-}" ]; then
      FAMILY="debian"
      CODENAME="$DEBIAN_CODENAME"
    else
      echo "Linux Mint detected but could not determine upstream codename (UBUNTU_CODENAME/DEBIAN_CODENAME missing)."
      exit 1
    fi
    ;;
  *)
    echo "This script supports Ubuntu, Debian, and Linux Mint. Detected: ${ID_LOWER}"
    exit 1
    ;;
esac

if [[ -z "$CODENAME" ]]; then
  echo "Could not determine upstream codename. Please set VERSION_CODENAME/UBUNTU_CODENAME/DEBIAN_CODENAME."
  exit 1
fi

echo "Detected system: ${PRETTY_NAME:-$ID_LOWER} (family: $FAMILY, codename: $CODENAME, arch: $ARCH)"

# ===== Preparation =====
echo "[1/6] Updating package list and installing prerequisites..."
as_root "apt-get update -y"
as_root "apt-get install -y ca-certificates curl gnupg lsb-release"

# Ensure keyring directory exists
as_root "install -m 0755 -d /etc/apt/keyrings"

# ===== Docker GPG key =====
echo "[2/6] Installing Docker GPG key..."
KEY_DST="/etc/apt/keyrings/docker.gpg"
if [[ "$FAMILY" == "ubuntu" ]]; then
  as_root "curl -fsSL https://download.docker.com/linux/ubuntu/gpg | gpg --dearmor -o '$KEY_DST'"
else
  as_root "curl -fsSL https://download.docker.com/linux/debian/gpg | gpg --dearmor -o '$KEY_DST'"
fi
as_root "chmod a+r '$KEY_DST'"

# ===== Add repository (idempotent) =====
echo "[3/6] Adding Docker APT repository..."
DOCKER_LIST="/etc/apt/sources.list.d/docker.list"
REPO_LINE="deb [arch=${ARCH} signed-by=${KEY_DST}] https://download.docker.com/linux/${FAMILY} ${CODENAME} stable"

if [ -f "$DOCKER_LIST" ] && grep -q "download.docker.com/linux" "$DOCKER_LIST"; then
  echo "Docker repository already exists: $DOCKER_LIST"
else
  as_root "echo '$REPO_LINE' > '$DOCKER_LIST'"
fi

# ===== Install Docker & Compose plugin =====
echo "[4/6] Installing Docker and Compose plugin..."
as_root "apt-get update -y"
as_root "apt-get install -y docker-ce docker-ce-cli containerd.io docker-buildx-plugin docker-compose-plugin"

# ===== Enable and start Docker =====
echo "[5/6] Enabling and starting Docker service..."
as_root "systemctl enable docker >/dev/null 2>&1 || true"
as_root "systemctl restart docker"

# ===== Add user to docker group =====
if [ "$(id -u)" -ne 0 ]; then
  echo "[6/6] Adding user '$USER' to the 'docker' group..."
  as_root "usermod -aG docker '$USER'"
  echo "Note: Log out and back in (or run 'newgrp docker') for group changes to take effect."
else
  echo "[6/6] Running as root: skipping user group modification."
fi

# ===== Optional: Install standalone docker-compose binary =====
if [ "$INSTALL_COMPOSE_STANDALONE" = true ]; then
  echo "[Optional] Installing standalone docker-compose ${COMPOSE_VERSION}..."
  need_cmd uname
  as_root "curl -L \"https://github.com/docker/compose/releases/download/${COMPOSE_VERSION}/docker-compose-$(uname -s)-$(uname -m)\" -o /usr/local/bin/docker-compose"
  as_root "chmod +x /usr/local/bin/docker-compose"
  echo "docker-compose version: $(/usr/local/bin/docker-compose --version || true)"
fi

# ===== Show versions =====
echo
echo "✅ Installation complete!"
echo "Docker:           $(docker --version 2>/dev/null || echo 'Not in PATH? Try logging out and back in.')"
echo "Docker Compose:   $(docker compose version 2>/dev/null || echo 'Plugin not found')"
echo
echo "Tip: Test your setup with ->  docker run --rm hello-world"
We then execute the file:
cd /home/
bash install.sh
After completing the script, Docker and Docker-Compose are installed.
⚠️ Important: We are now creating a special network in which the individual containers will later operate together:
docker network create --subnet=172.37.51.0/24 matrixnetworkWe start with Matrix Synapse and go to the synapse folder and execute the following command:
cd /home/synapse/docker run --rm \
-v /home/synapse/data:/data \
-e SYNAPSE_CONFIG_PATH=/data/homeserver.yaml \
-e SYNAPSE_SERVER_NAME=subdomain.deinedomain.com \
-e SYNAPSE_REPORT_STATS=no \
matrixdotorg/synapse:latest generate⚠️ “subdomain.deinedomain.de” is of course changed beforehand with your own domain. e.g.: matrix.deinedomain.de
The script has now created the so-called homeserver.yaml file in the /synapse/data/ folder.
We open this with :
nano /home/synapse/data/homeserver.yamlThe file should look like this:
server_name: "matrix.deinedomain.com"
pid_file: /data/homeserver.pid
listeners:
  - port: 8008
    tls: false
    type: http
    x_forwarded: true
    resources:
      - names: [client, federation]
        compress: false
#database:
 # name: sqlite3
  #args:
   # database: /data/homeserver.db
# Datenbank Einstellungen
database:
  name: psycopg2
  args:
    user: synapseuser
    password: 7Kn33B655TgV339-777bN
    database: synapsedb
    host: synapse-db
    port: 5432
    cp_min: 5
    cp_max: 10

log_config: "/data/matrix.deinedomain.com.log.config"
media_store_path: /data/media_store
registration_shared_secret: "N42a1.-58.nB,dkym:N4Jb=b7L+b@cW589HcF&4if~A0iD8e*FQ"
enable_registration: false
report_stats: false
macaroon_secret_key: "XHfX:isQQ44BNbpXcU44pKe55Q+IOH9dfH5SVYAykjnONFzEmp"
form_secret: "&Ld^9od94fYE=mDb,Q8RYaGuJH;##KCCB:AIq3KAL+X23dxE3"
signing_key_path: "/data/matrix.domain.com.signing.key"
trusted_key_servers:
  - server_name: "matrix.org"

experimental_features:
  msc3266_enabled: true
  msc4222_enabled: true
  msc4140_enabled: true
max_event_delay_duration: 24h
rc_message:
  per_second: 0.5
  burst_count: 30
rc_delayed_event_mgmt:
  per_second: 1
  burst_count: 20

# Delete all media older than 120 days

media_retention:
    local_media_lifetime: 120d
    remote_media_lifetime: 120d

#Limit Upload File Size to 250 Megabyte
max_upload_size: 250M

# Activates the .well-known URL config for the Port 443 - is later requiered for Element Call !!
#serve_server_wellknown: true

# vim:ft=yaml
⚠️ It is important to change the database settings as follows:
#database:
 # name: sqlite3
  #args:
   # database: /data/homeserver.db
# Datenbank Einstellungen
database:
  name: psycopg2
  args:
    user: synapseuser
    password: 7Kn33B655TgV339-777bN
    database: synapsedb
    host: synapse-db
    port: 5432
    cp_min: 5
    cp_max: 10
This deactivates the SQL3 database and activates Postgres.
We save the file (CTRL+O) and close the editor again (CTRL+X) and now create the “docker-compose.yml” file in the Synapse folder:
nano /home/synapse/docker-compose.ymlYou can use the following Compose file and modify it with your data (change the password for Postgres):
version: "3.9"
services:
  synapse-db:
    image: postgres:17.4
    networks:
      matrixnetwork:
        ipv4_address: 172.37.51.12
    container_name: Synapse-DB
    hostname: synapse-db
    security_opt:
      - no-new-privileges:true
    healthcheck:
      test: ["CMD", "pg_isready", "-q", "-d", "synapsedb", "-U", "synapseuser"]
      timeout: 45s
      interval: 10s
      retries: 10
    volumes:
      - /home/synapse/db:/var/lib/postgresql/data
    environment:
      - POSTGRES_DB=synapsedb
      - POSTGRES_USER=synapseuser
      - POSTGRES_PASSWORD=7Kn33B655TgV339-777bN
      - POSTGRES_INITDB_ARGS=--encoding=UTF-8 --lc-collate=C --lc-ctype=C
    restart: always

  synapse:
    image: matrixdotorg/synapse:latest
    networks:
      matrixnetwork:
        ipv4_address: 172.37.51.13
    container_name: Synapse
    hostname: synapse
    security_opt:
      - no-new-privileges:true
    environment:
      - TZ=Europe/Berlin
      - SYNAPSE_CONFIG_PATH=/data/homeserver.yaml
    volumes:
      - /home/synapse/data:/data
    ports:
      - 8008:8008
    restart: always
    depends_on:
      synapse-db:
        condition: service_started

networks:
  matrixnetwork:
    external: true
Now let’s go back to the project directory and start the container:
cd /home/synapse
docker compose up -d
We can query the result with “docker ps” in the command line. We should see that the containers (Synapse and the database) are running as “Healthy”:

We create the first user (Admin) with the following command:
⚠️ Important: change back to the /home/synapse/ directory!
docker compose exec synapse register_new_matrix_user -u benutzername -p passwort -a -k "geheimes-passwort" http://localhost:8008Explanation:
-u: desired user name-p: password-a: makes the user an admin (optional)-k: shared secret fromhomeserver.yamlhttp://localhost:8008: Synapse Admin-API-Endpunkt (Pay attention to correct address, possibly http://synapse:8008 within Compose)
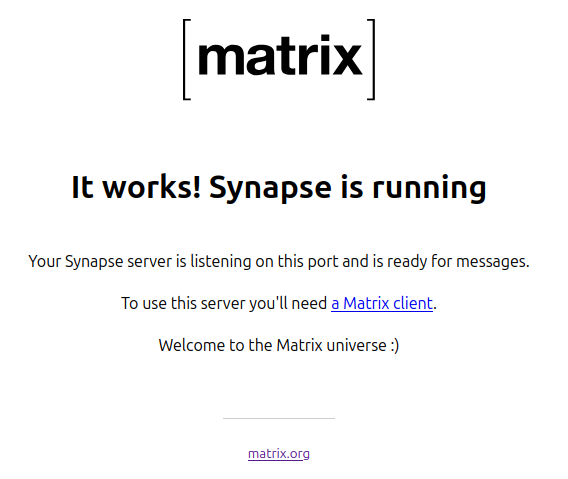
✅ Done: Part 1 is complete. Matrix Synapse is installed. Congratulations! You can verify this by visiting the URL:
http://server-ip:8008
Next step: NPM – Install Nginx Proxy Manager as Docker (SSL certificate / HTTPS)
nano /home/npm/docker-compose.ymlWe add the following code to the file:
version: '3'
services:
  app:
    image: 'jc21/nginx-proxy-manager:latest'
    ports:
      - '80:80'
      - '81:81'
      - '443:443'
    networks:
      matrixnetwork:
        ipv4_address: 172.37.51.10
    environment:
      DB_MYSQL_HOST: "db"
      DB_MYSQL_PORT: 3306
      DB_MYSQL_USER: "npm"
      DB_MYSQL_PASSWORD: "npm"
      DB_MYSQL_NAME: "npm"
    restart: always
    volumes:
      - ./data:/data
      - ./letsencrypt:/etc/letsencrypt

  db:
    image: 'jc21/mariadb-aria:latest'
    networks:
      matrixnetwork:
        ipv4_address: 172.37.51.11
    environment:
      MYSQL_ROOT_PASSWORD: 'npm'
      MYSQL_DATABASE: 'npm'
      MYSQL_USER: 'npm'
      MYSQL_PASSWORD: 'npm'
    restart: always
    volumes:
      - ./mysql:/var/lib/mysql

networks:
  matrixnetwork:
    external: true
Now we’ll ensure that the database is always started alongside NPM at system startup. This doesn’t always work in docker-compose.yml, and you can’t log in to NPM on the interface.
✅ The solution is a: “systemd-Service”
Create Service File (z. B. /etc/systemd/system/npm-stack.service):
[Unit]
Description=Docker Compose Nginx Proxy Manager Stack
Requires=docker.service
After=docker.service

[Service]
WorkingDirectory=/pfad/zum/docker-compose-verzeichnis
ExecStart=/usr/local/bin/docker-compose up -d
Restart=always
TimeoutStartSec=0

[Install]
WantedBy=multi-user.target
⚠️ Adjust the WorkingDirectory path to the folder containing docker-compose.yml (/home/npm)
Activate and start:
sudo systemctl daemon-reexec
sudo systemctl enable npm-stack
sudo systemctl start npm-stack
✅ Result:
Now the entire NPM stack—including mariadb-aria—starts automatically when the system boots, without having to manually run docker compose up. We start the NPM container by navigating to the /home/npm/ directory and executing the following command:
docker compose up -dNow we open the NPM admin interface using: http://IP-ADDRESS:81 and get the following screen:
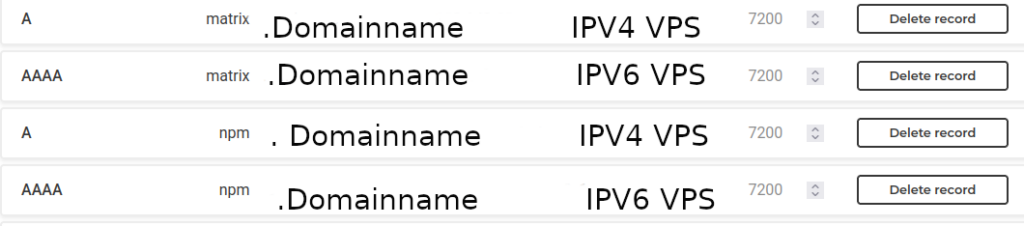
We log in with: – admin@example.com – changeme And we can now assign our own user credentials. It’s important now that we create various subdomains: – npm.domain.de – matrix.domain.de The subdomains point to the VPS on which everything is installed in Hetzner’s DNS settings. Once we’ve done that, we’ll continue with NPM:
In NPM we now click on “Hosts” -> “Proxy Hosts” -> “Add Proxy Host” and add the following:
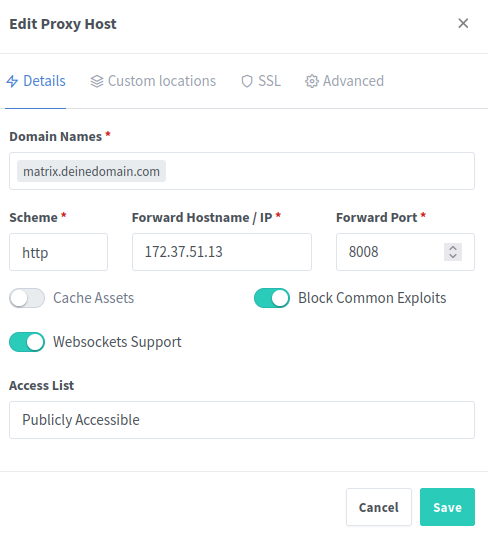
⚠️ Important: The containers’ internal Docker IPs are used for forwarding. This prevents future errors. We set up the special Docker network at the very beginning of the tutorial for this purpose. All containers are on the same network. Continue: Then click on the SSL tab:
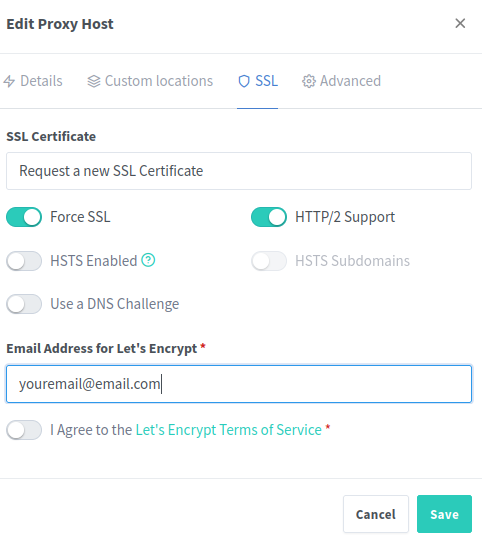
Now click Save and you’ve set up a reverse proxy. Your Matrix server is now accessible via https:// at “matrix.domainname.de.” Do the same with NPM to ensure it’s also secured via SSL:

And again request the SSL certificate under SSL.
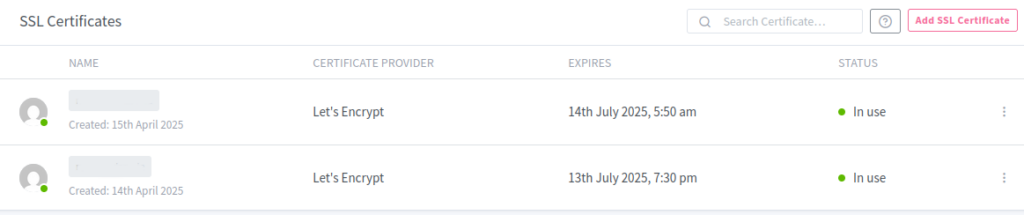
The SSL certificates can now be viewed in NPM under “SSL Certificates”:
✅ Done! Matrix Synapse with NPM (both in Docker containers) has been installed on a VPS on the internet.
 |  | |
| bc1pnks6qsyumceygnw760x6dthqzngm3pt5xtpkrh3n9ydm3e8ekgms7r4azl | Lightning: itsc@strike.me | https://paypal.me/TomC777 |
 |  |  |